|
If you're not a fan of resist dyeing, try your hand at painting with dye! This works well if you have a lighter base color and are painting a darker color on top, unless you desire the painting to blend with the base color and make a secondary color. To begin, you will need the following supplies:
To prepare thickened dye, I like to premix in an empty container first, without adding the dye. I use either a baby food jar or an empty coffee creamer container. When using sodium alginate, you need to wait about an hour for it to thicken before using it. Since I dye pretty regularly and don't like waiting for dye to thicken, I make a bulk amount of thickener in advance. I start with a bit more than the ratio recommended on the package (Dharma recommends 1/8 tsp sodium alginate for 6 oz warm water). I find that I prefer a thicker texture and use about 1/4 tsp per 6 oz of water, and then I double the recipe and use a coffee creamer bottle to mix it in. When mixing, you need to make sure that it is completely dissolved. This is very difficult, since it likes to thicken on contact and clump together. You can use a blender to mix it, if needed. You may want your dye to be even thicker than this (for example, you want a very detailed design rather than a hand brushed, all-over color), and to do this you would measure out more sodium alginate. I sometimes use as much as 1/2-1 tsp of sodium alginate instead of the recommended 1/8 tsp. Once you have dissolved it, let the bottle sit for at least one hour in the fridge. The thickened water will keep for weeks, which is why I like to prepare a batch in advance. 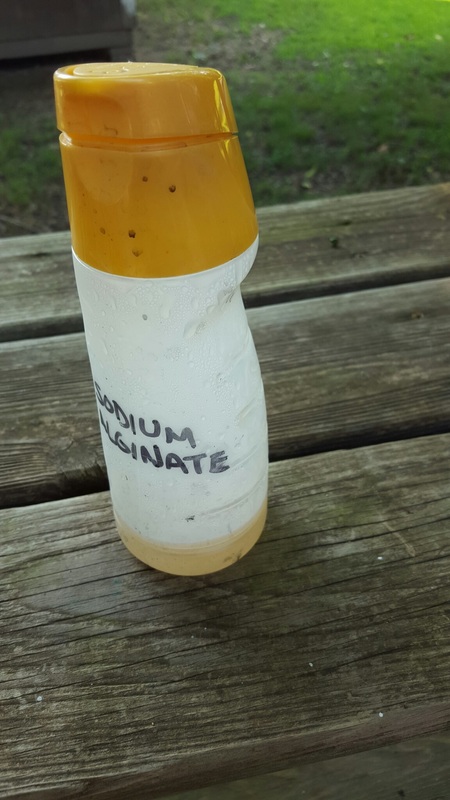 How I like to store my prepared sodium alginate solution. Now you can pour out the amount of liquid needed to mix the dye for your painted design. I like to use a small plastic cup or a baby food jar. For a small amount, I pour out 3 oz of my prepared thickener and add 1/2 tsp of dye (depending on the color; some colors require more dye). Mix it up and you're ready to paint! If you need to make your own stencil, freezer paper is perfect for this, because it can be ironed to the fabric while you are painting. To make a stencil, find or make your image (Google image or type out your message on MS Word, etc). If you're printing it from the computer, you can either print it directly onto the freezer paper, or you can print it onto computer paper. Next, adhere the computer paper (if applicable) to the freezer paper and use an X-acto knife to trace and cut out the design. With the waxy side down, iron the paper to the fabric. Use your paintbrush to apply the dye in the stenciled areas, and peel off the paper. If you are doing a repeat pattern throughout the fabric, you can continue to iron the freezer paper over and over until it is no longer needed. As you paint, you will want to check the underside of the fabric and ensure that it is fully saturated all the way through. I normally paint on top of cardboard, or you could suspend it in a hoop to make sure that the dye penetrates to the other side. 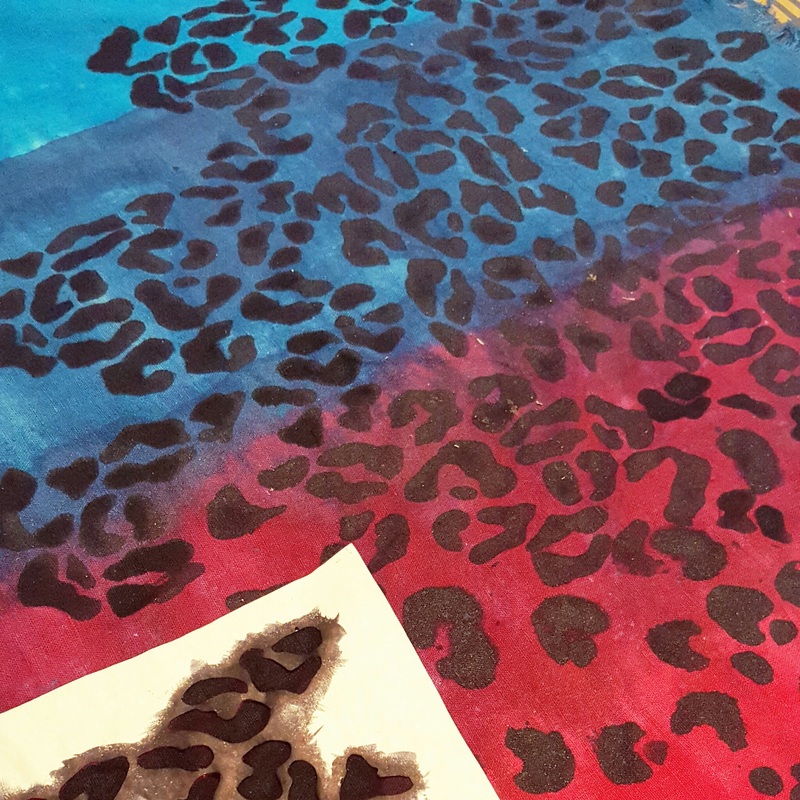 Seeing spots! 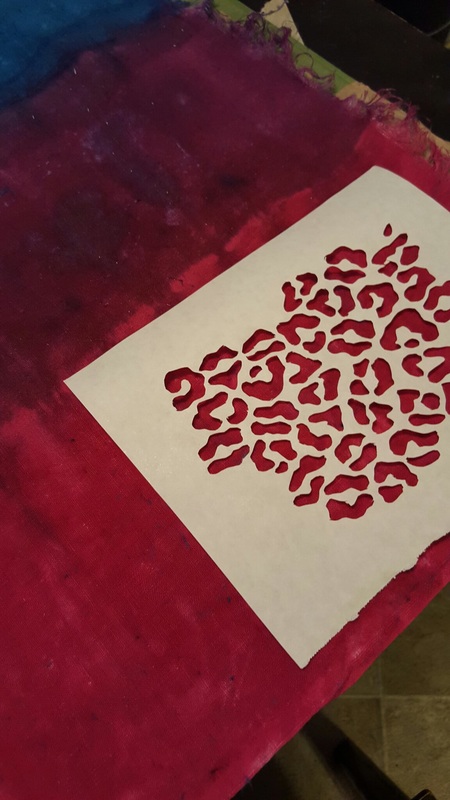 Freezer paper stencil 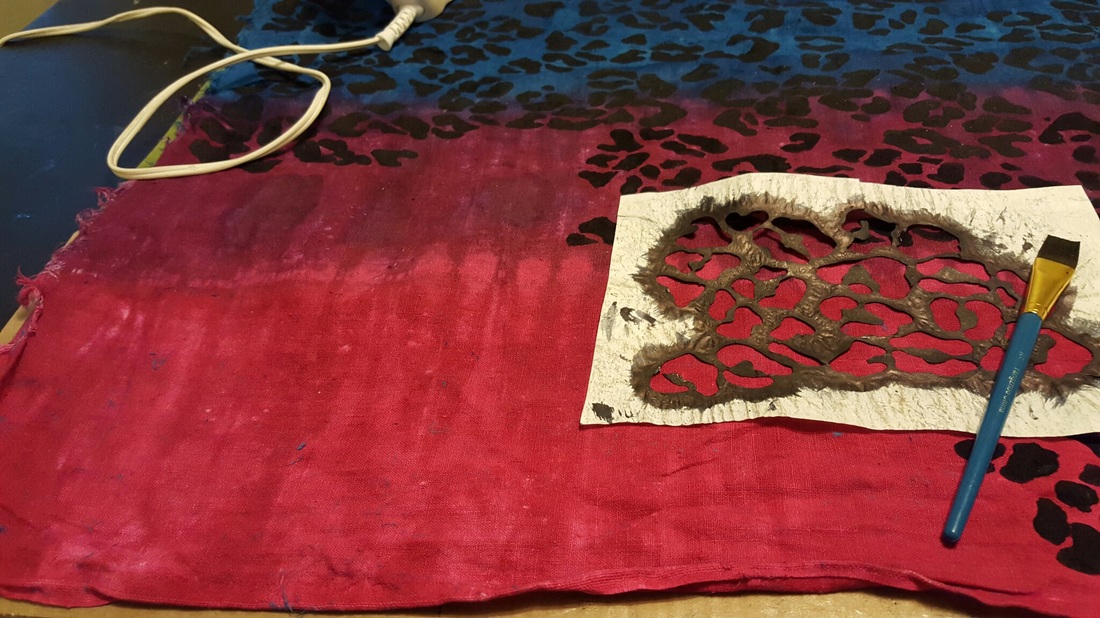 Ironing the stencil and painting the thickened dye onto the fabric. A note on soda ash: since you are working with fiber reactive dyes, you will need a "fixer" to make these dyes permanent. Soda ash, or washing soda, is necessary for any procion MX dye. To apply the soda ash to your painted design, you have two choices: you can either presoak the fabric in soda ash solution (1 cup per gallon of water) and wait for it to dry, or you can spray the fabric down with soda ash after the thickened dye is applied. For the sling pictured in this tutorial (I call it a Lisa Frank inspired leopard!), I first tie dyed the fabric in solid stripes of fuschia, raspberry, cerulean blue and turquoise. I used sinew to tie it and had presoaked it in soda ash solution. After batching overnight in the summer heat, I rinsed and washed thoroughly, then dried. Next, I mixed some black dye powder with my prepared batch of thickened dye (I keep a batch in my fridge at all times!), and painted the spots on using a freezer paper stencil that I made. After I finished the spots, I sprayed the fabric with soda ash water and let it batch until dry. I then washed and dried as usual, getting rid of all excess dye and making it colorfast. I find that the best way for me to rinse my dyed wraps and slings is to do 1-2 cold wash cycles in my washing machine, then a hot water soak with Dawn dish soap. You only need a drop or two, and it will help release any loose excess dye. Then do another hot wash and check to see if the water is clear. Rinse until the water is clear, then air or machine dry. Dyeing and painting fabric is a lot of work and requires time, patience and most importantly, research! I hope this tutorial helps inspire you to try hand dyeing!  Lisa Frank-inspired ring sling, hand dyed and painted by New Earth Baby
1 Comment
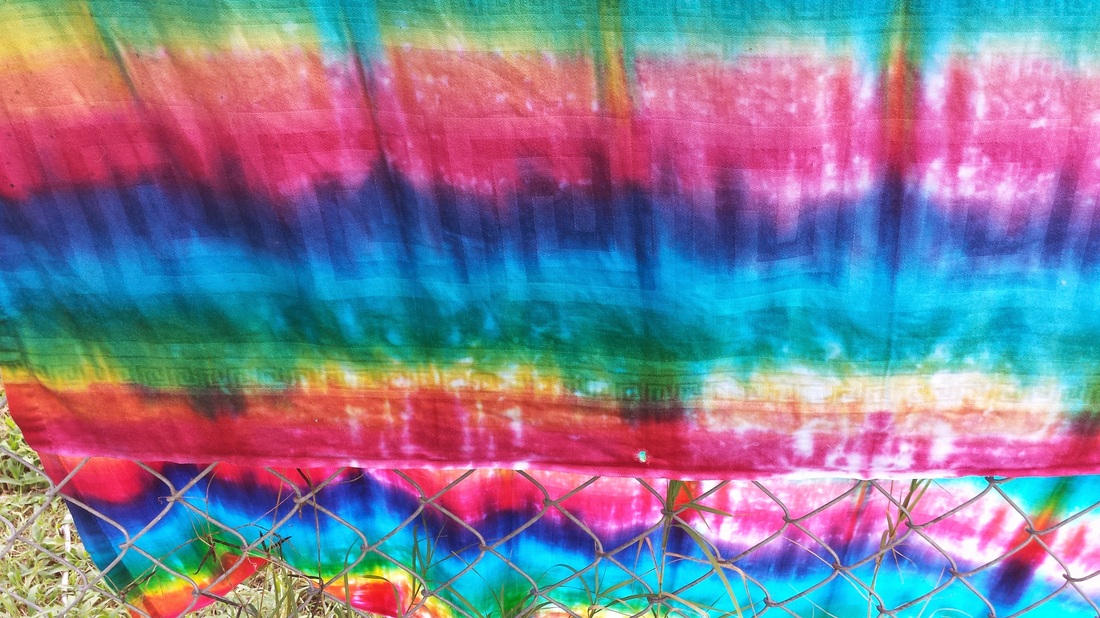
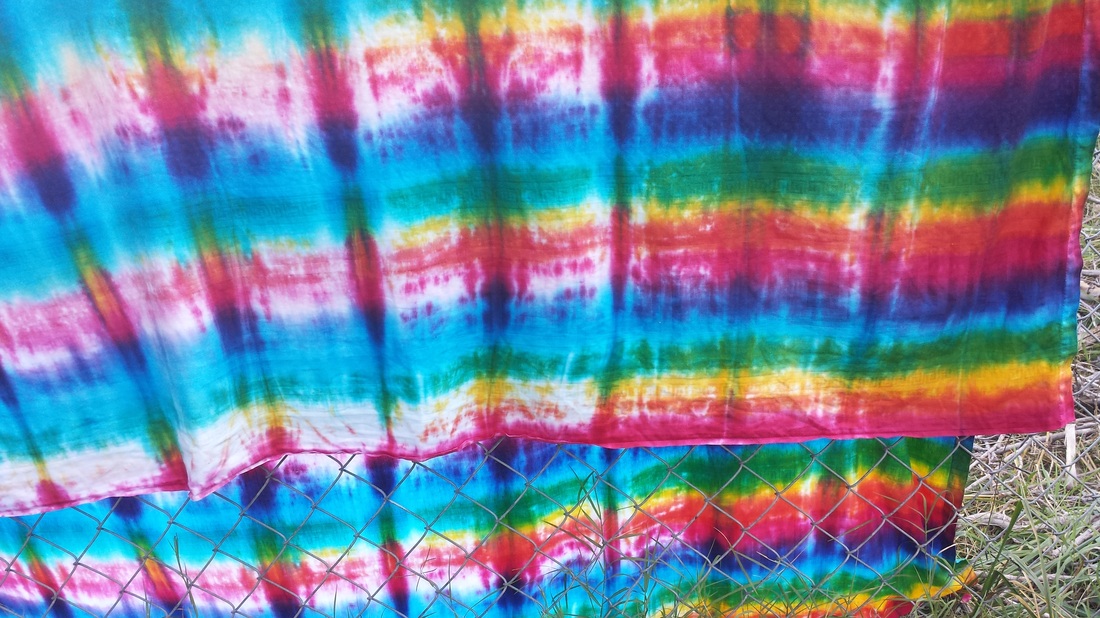
My previous babywearing DIY blog post was the rainbow dye job, using a white tablecloth I owned. It measured 67" x 80", was 100% cotton and was very easy to dye. The tutorial on how I dyed it can be found here. I have been wanting to try my own mei tai carrier for some time, and this was the perfect opportunity. A mei tai (pronounced like MAY-tie) is a type of soft-structured carrier (SSC), almost like an Ergo or Tula, but without any buckles. To secure it, you tie it in a similar fashion to a wrap. There is a body panel with two straps that go over the wearer's shoulders, and one waist strap that ties at the waist. Some mei tais are designed with rings at the waist instead. For mine, I used a great tutorial I found on Pinterest. It gives you instructions on how to draft your own body panel, which I found a little on the difficult side, but you can skip the curves and angles and just make a large rectangle with the same width and height. Here is the tutorial: Handmade Mei Tai Baby Carrier I accidentally made my shoulder straps too narrow, so they are half the size they are supposed to be. I also added a hood, which I freehanded by making a rectangle and adding drawstrings to the sides. For the inner panel, I had a separate piece of osnaburg that I dyed blue. I wanted this to be a Rainbow Dash themed carrier, and will be adding a cutie mark to the hood! When not in use, the rainbow side of the hood is visible. My girl happens to hate wearing hoods, so it is usually hanging down, but when she falls asleep it is nice to have the option to pull it up and keep the sun out of her eyes. Overall, I love this thing. It is super convenient, and very close to being a wrap, which are my favorite carriers. I am not crazy about Ergo carriers, only because I am petite and some of their waistbands are extremely hard for me to get tight enough around my waist. They are also (sorry, buckled carrier fans) a lot uglier, and I like my baby carriers to be beautiful! I have worn this carrier all over town and at several events, including an amusement park. No stroller to park or maneuver through crowds and lines, and when she fell asleep, my husband tied her up and she stayed asleep for much longer than she would have in a stroller. That day, I had two other moms walk up to me and ask me where in the world I got such an amazing carrier, and I was so proud and happy to give them this blog and some basic instructions. I am currently finishing up a carrier made with my last ice dyed creation, so stay tuned for that one! I'll also be making one with a cotton outer, and will be taking pictures of the process, so there will be a tutorial with step-by-step instructions. I'll also be adding a new section to this website: embroidery! Thanks for reading, and as always, I welcome any comments or pictures of your own creations! Also, if you are a DIYer and would like to be a guest blogger for a project idea you have, feel free to email me! 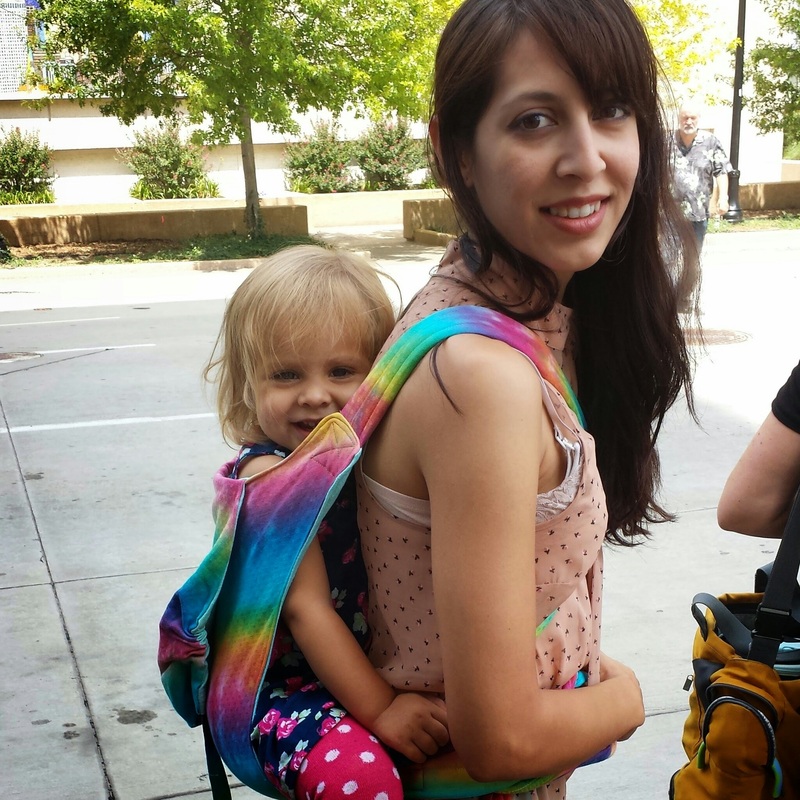 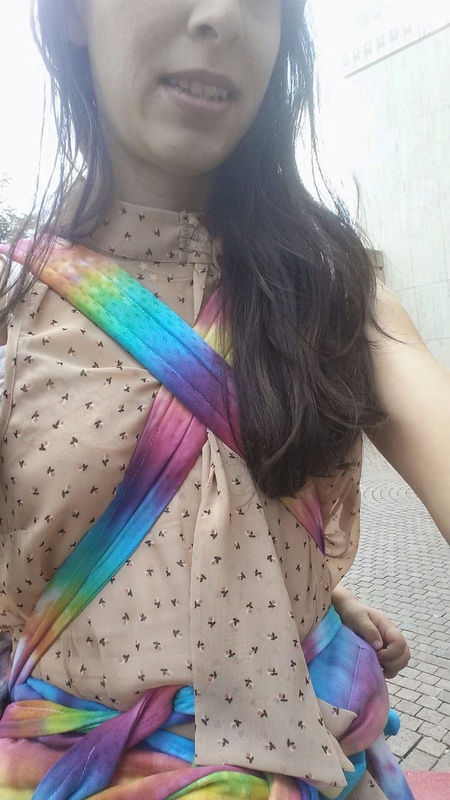 I like to cross the straps in front, swing them underneath her legs, cross in the back and tie up front. 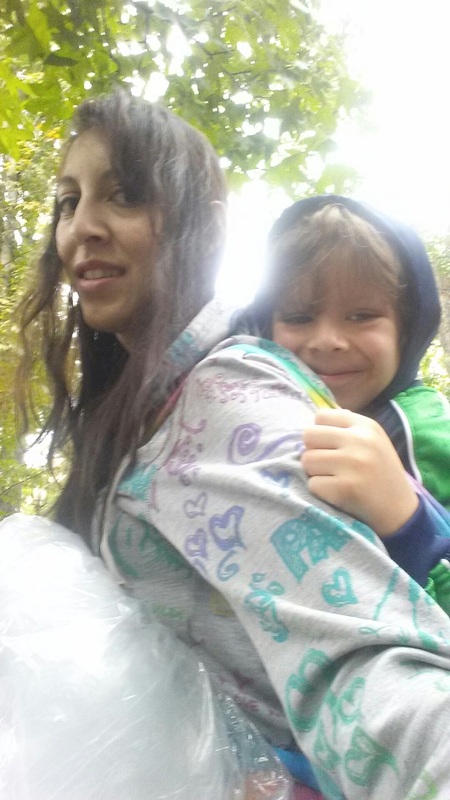 It holds my 5 year-old as well! 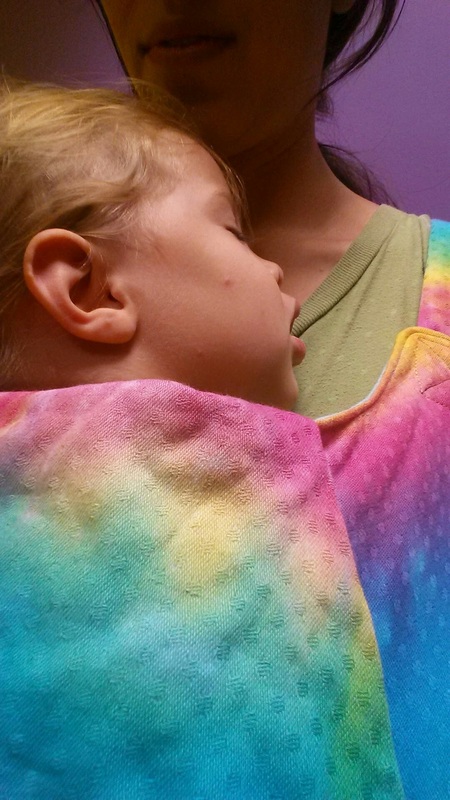 Plenty of sleepy dust in this carrier! 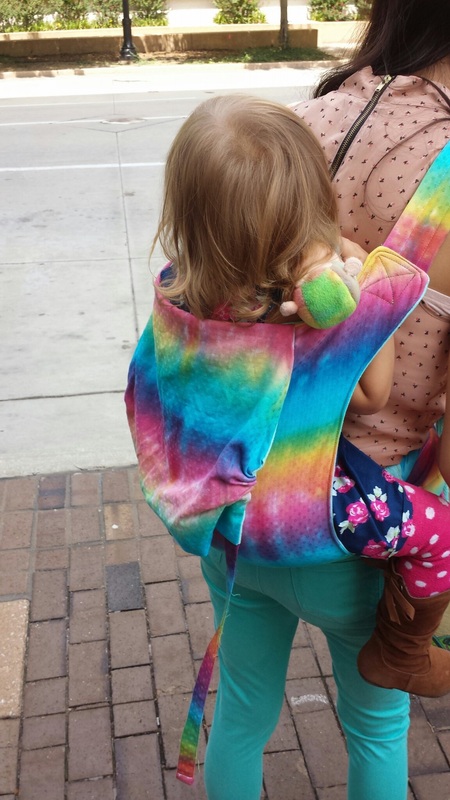 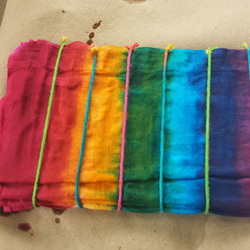 My fellow dyers understand: nothing white is safe in my house. I've dyed all of my kids' old diapers that I now use as washcloths and dish towels. And since discovering the world of DIY baby carriers, I have wanted to try a mei tai. I meant to make one with some of the osnaburg I bought online through fabric.com, but then I found buried in my linen closet the white tablecloth my mom gave me ages ago. Perfect! It was just begging me to do something to cover the stains it had acquired over the years. I am a huge fan of rainbows (specifically, rainbows and unicorns and neon colors - what can I say? I'm an 80s/90s Lisa Frank kid). I have seen people dye rainbows and they always seemed to use separate dyes for the secondary colors: orange, green and violet. I wanted to try it with only the 3 primaries: red, yellow and blue. First, I prepped the tablecloth, which measures about 67" x 80" by washing it on a normal cycle on hot. I scoured it in my large canning pot, adding 1 cup washing soda and 1 tablespoon blue Dawn dish soap to the water, which was just enough to cover the fabric. I let it boil for at least 30 minutes. After rinsing, I filled my pot back up with water and another cup of washing soda. I set the fabric inside and left it. This step is very important if you want vibrant colors. You can let it soak for days, if you like, but the minimum should be about an hour. I work outside the home and have a busy schedule, so it ended up soaking for almost a week before I got to dye it! When I was ready, I wrung the fabric out and placed it in my washing machine. I set it to spin cycle, and when it was done it was damp and not dripp ing. From here, I folded it in half and then did an accordion fold (below). Since I will be making a mei tai from this fabric, I am not terribly particular about the direction of the stripes, but I knew I wanted to repeat the spectrum a few times down the length of the tablecloth. 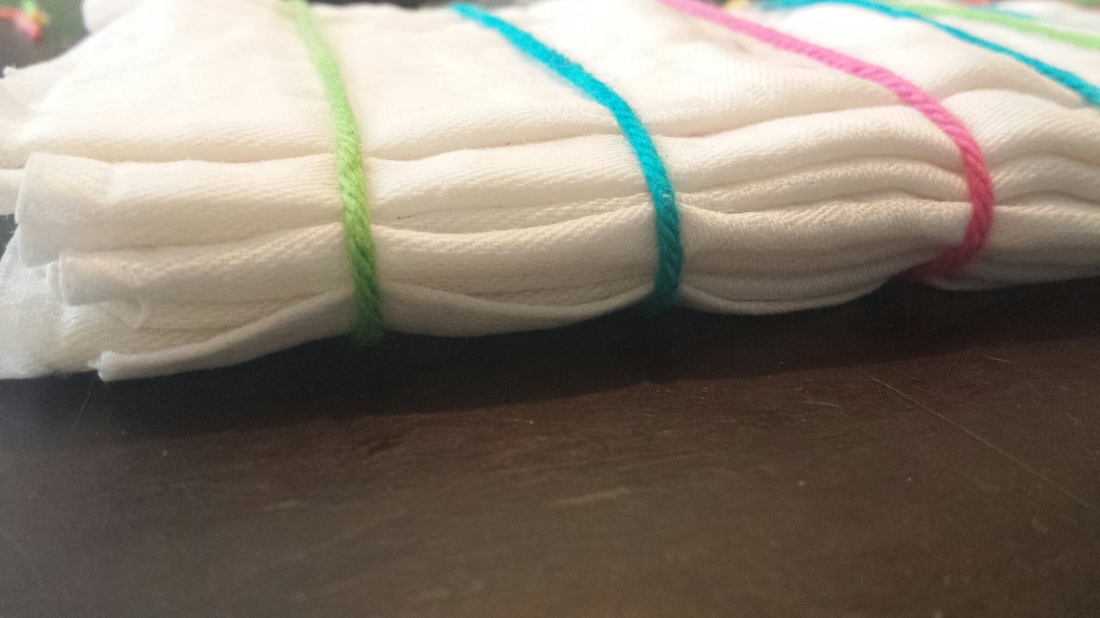
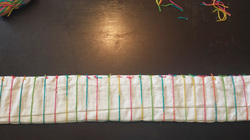 After folding, I tied it loosely in increments to separate the colors. I used yarn because I didn't want the lines to be distinct. f you want white lines in your design, you would tighten the strings and/or use rubber bands and tie them tightly. (My lovely rainbow yarn is one of the best purchases ever; I've used it for several projects and hellooooo, it's RAINBOW!)  Red, blue and yellow dye Red, blue and yellow dye After prepping my fabric, I premixed my dyes. For this project, I used two packets of Tulip brand fiber reactive dyes: Red and Yellow. For the blue, I used two teaspoons of Dharma's Procion dye, Turquoise #25 (available only online at Dharma Trading Company). I followed the directions on the packets for the red and yellow, but I accidentally diluted the yellow dye too much (insert sad face). For future projects, I will most likely be using the Procion dyes again; I really love how vibrant the colors stay after rinsing, and it is a better value for the same amount of money I pay for the cheaper store brands. I have a roll of brown paper that I use for just about everything from tie dyeing to drafting sewing patterns to DIY floors (yes, you can "tile' your floor wth brown paper and polyurethane and I've done it!). If you don't have any, newspaper or brown paper bags from the grocery store will work. You won't want to use plastic; I know that it *sounds* like a good idea, but any dye runoff will have nowhere to go except back into the fabric and can trickle down to unwanted areas. For maximum control over your dye, use an absorbent, disposable dropcloth. Now comes the fun part! To start, if you think it will help, you could notate on your brown paper which section is assigned to each color. I didn't need to, but in order to avoid getting confused at which color I was on, I skipped the secondary colors. To do it like this, here are your directions: 1. Red 2. (skip) 3. Yellow 4. (skip) 5. Blue 6. (skip) 7. Go back to section 2 and add a few squirts of red, immediately followed by several squirts of yellow. Allow the colors to mix. 8. Go back to section 4 and add a few squirts of blue, followed by several squirts of green. Allow to blend through and underneath the ties if you are wanting to avoid white lines. 9. Go back to section 6 and add a few squirts of blue, followed by several squirts of red. Allow the red to bleed into a red-violet color so that the top of section 6 is indigo that fades into violet (a true spectrum). 10: Repeat. I find it a LOT easier to skip the secondary colors. It prevents unwanted bleeding, as well as keeps you from forgetting what color you are supposed to be on. It's easy to get carried away! For the first set of stripes, you will have something that looks like this: 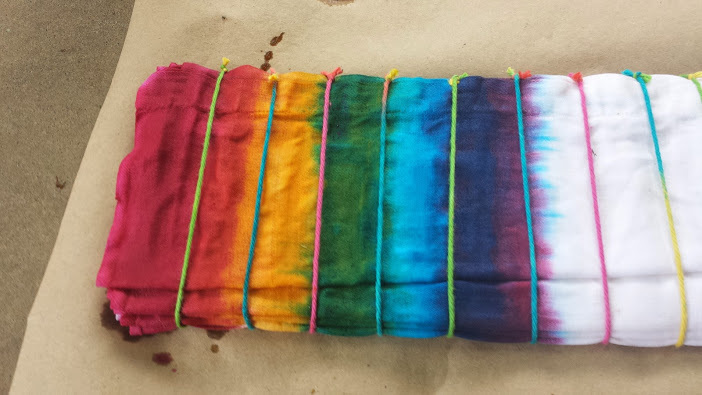
Continue the process all the way down, skipping the secondary colors for each spectrum: 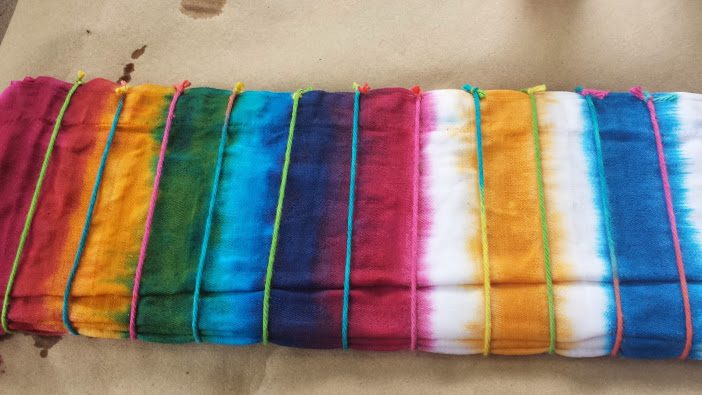
Skipping the secondary colors
Once you get to the end, get a new piece of brown paper or newspaper and flip the whole thing over. Repeat for the other side. Be sure to get in between the folds as much as possible; I missed a few folds and the dye did not penetrate, giving me more white than I wanted (sad face!). After it is finished, place the fabric into a large garbage bag and set it in the sun. I set mine in my backyard, in direct sun, for 24 hours. To rinse, I threw the whole thing, ties and all, into my washer. Rinsing is my least favorite part about dyeing; this step is one I learned from the pros, and I had my doubts, but it turned out to be WAY easier than crouching over my bathtub or standing in my front yard with the hose, waving at the neighbors as they raise their eyebrows at the crazy hippie lady soaking herself with water and dye. After a cold wash and rinse, I was just too impatient to do another wash, so I pulled it out and took a peek at it. And....voila! After ooohing and aahhhing, I put it into the dryer to let some heat set the dyes some more, then did another cold wash before I did a hot wash and dry. The colors faded a bit, but not enough to make me disappointed. I did notice that the yellow did not penetrate as well as I had hoped, but overall, I am satisfied with it and I think it will make a good mei tai.
Stay tuned for my tutorial on converting this into a mei tai baby carrier! 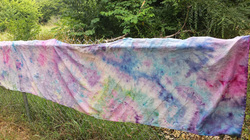 DIY ice dyed shorty size 3 wrap DIY ice dyed shorty size 3 wrap In this tutorial, I am dyeing fabric that I finished to create a size 3 wrap. Along the way, I will be going over what types of fabrics you can choose from to safely make your own DIY wrap. Woven wraps are great for carrying babes and toddlers of all sizes and ages, but they can get pretty pricey. My size 7 Ellvill Zara tri-green costs over $200 retail (best baby shower present EVER!). You can, however find plenty of other woven wraps for around $100 or less, and you can check my Resources page for some tips on getting wraps and carriers. For my DIYers, there are lots of options; the possibilities are endless!
Linen and cotton are breathable fabrics that are lightweight but still strong enough to hold 45+ lbs of weight, easily. I can back carry my 4 (almost 5) year-old in this wrap. A size 3 wrap is a good length for me; if you are a plus sized mama, you might want to try a size up, maybe a size 4 or 5. If you are browsing a fabric store, you will want to head to the utility fabrics section. You should be looking at a wall of plain and/or natural colored fabrics such as muslin, linen, etc. When it comes to choosing your fabric for something you will be entrusting your child's safety with, you want to make sure you choose the right kind. Here are some tried and true options: Fabrics that are safe for wrapping are between 5.3 - 7oz and are:
Fabrics that are not safe for wrapping:
Once you have picked out your fabric, you will need to know how much to buy. Here is the handy dandy wrap size chart: size 2 - 2.7 meters = 8.86 feet = 102.36 inches (2.84 yards) size 3 - 3.1 meters = 10.17 feet = 122.05 inches (3.39 yards) size 4 - 3.6 meters = 11.81 feet = 141.73 inches (3.93 yards) size 5 - 4.2 meters = 13.78 feet = 165 inches (4.58 yards) size 6 - 4.6 meters = 15.09 feet = 181.10 inches (5.03 yards) size 7 - 5.2 meters = 17.06 feet = 204.72 inches (5.68 yards) size 8 – 5.60 meters = 18.37 feet = 220.47 inches (6.12 yards) (http://paxbaby.com/paxbabys-woven-wrap-guide/) Your wrap can be anywhere between 28" - 32" wide, depending on preference. I cut mine at 30" and hem both side about 1/2" each, which gives me a 29" width. Click on "Read More" for some scouring, hemming and ice dyeing instructions: Grad dye, ombre - whatever you want to call it - it's all the rage nowadays. Search for "ombre" on Pinterest and you will find everything from hair to nails, home decor and fashion. In the world of dyeing, it's usually referred to as "dip-dyeing" or as a grad (graduated) dye. The idea is that you have a darker color that fades into white, or into another color. Last weekend, I had the privilege of converting another innocent person to the dark side. By dark side, I mean Addictive World of Fabric Dyeing. I was visiting a friend and she was looking for a good carrier for a toddler. It was my first time doing a grad dye, and my first time seeing a glue resist that actually worked! The finished product was great, and I would post a photo but the "after" pictures include my friend and her kids and I respect their right to privacy. So for this tutorial, I will show you the grad dye that I did this week, for a long piece of fabric that I was given. It is some type of linen/cotton blend and had a 60" width, which means that it was wide enough to cut into TWO wraps! I am saving that one for my friend. For starters, here is a list of what you will need for your DIY grad dye wrap:
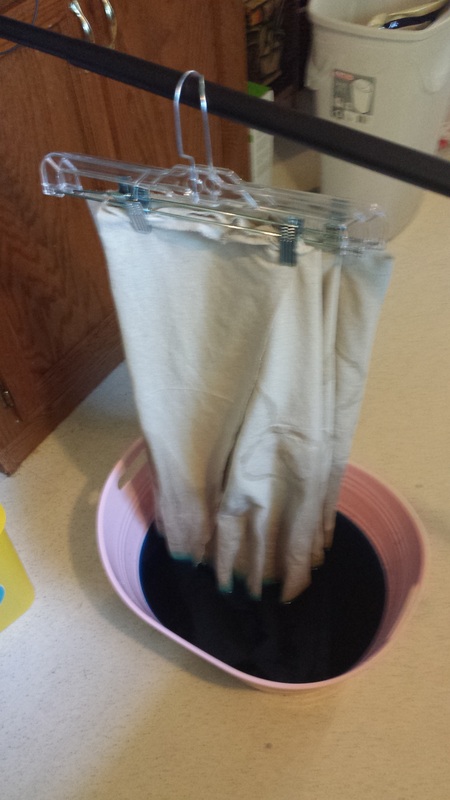
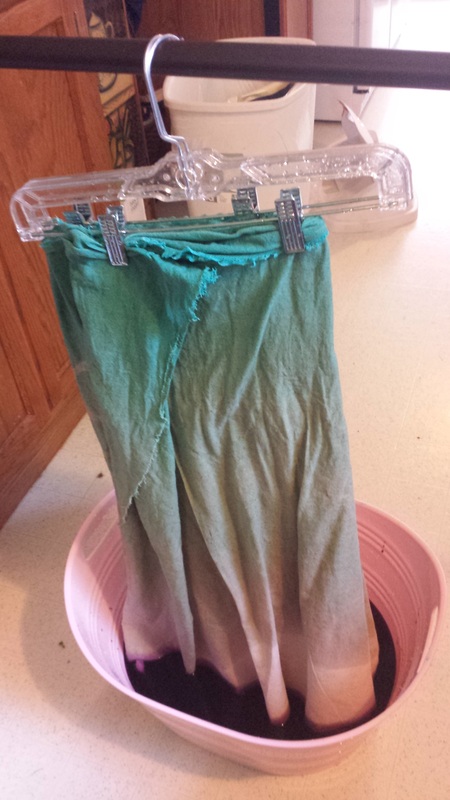
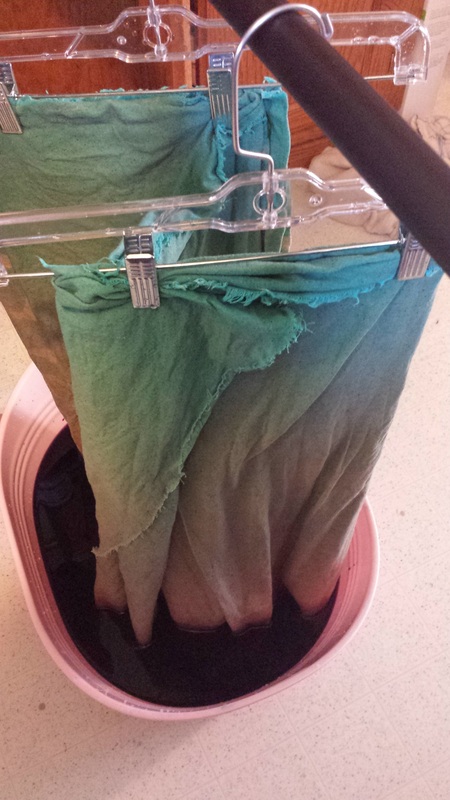
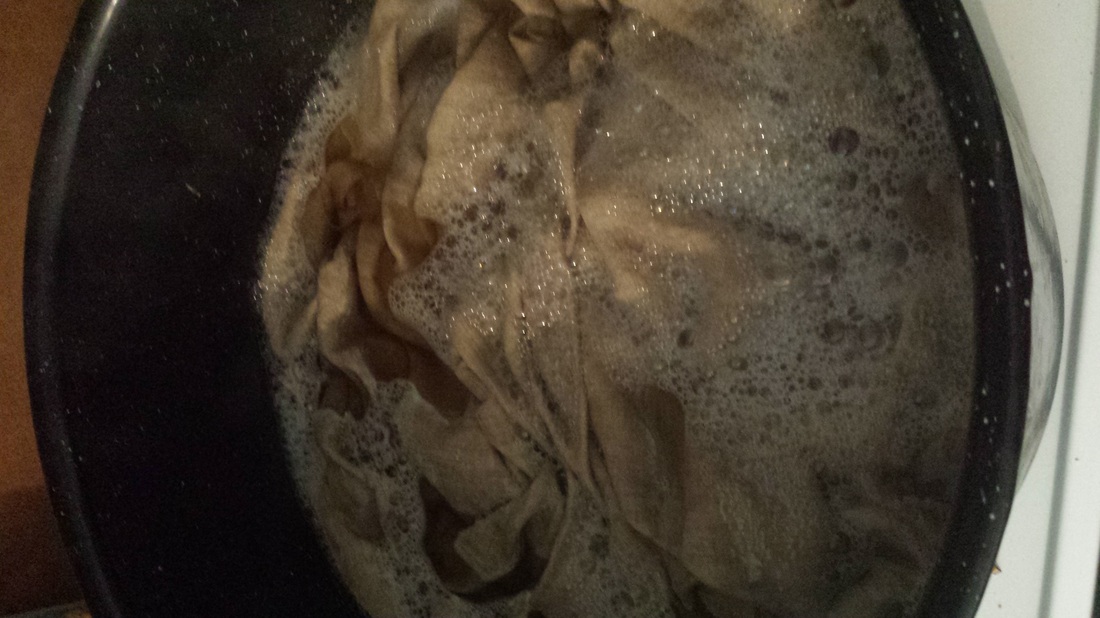
I had some black and dome pink dye leftover from my galaxy wrap, so I decided to try a grad dye using both. I did have to pick up an extra packet of each color, so I had two 1.75 oz Dylon Velvet Black, 1 Tulip fuchsia and 1 Dylon Flamingo Pink. 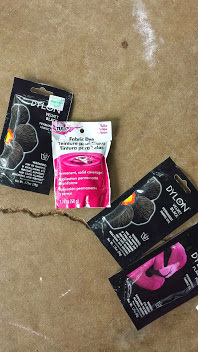 It's totally OK to mix brands, as long as they are fiber reactive dyes, which these are. You can find these dyes locally, at Joann Fabrics, Hobby Lobby or Walmart, but steer clear of Rit brand dyes for baby/kid items. Rit dye is not fiber reactive, which means that it does not bond with the fibers completely. Because of this, if your baby sucks on the fabric, the dyes could bleed and be ingested. This also means that your colors will fade a lot quicker over time. I've seen a friend dye osnaburg with Rit and I was shocked at how faded it looked after the inital dye bath. :( Anyway, my wrap ended up 138 inches long, 28" wide after washing, scouring and hemming. This is a few inches longer than a standard size 3 wrap. I did not taper this wrap and so far, I love it. Tapers are pretty on certain carries, but most often I just find them more annoying than helpful. To start, make sure to wash and dry your fabric at least once or twice to allow it to shrink. Shrinking is a good thing, as it will tighten the weave. Next, you will want to scour your fabric. To do this, select a large pot (I use a canning pot that I found at a thrift store) and fill it with enough water to submerge your fabric. For my 3.5 yards of fabric, I added a cup of washing soda (in the laundry detergent aisle of Walmart and most grocery stores; it looks like this) and about a tablespoon of blue Dawn dish detergent. I added the fabric and turned on the heat. I let it boil for about 30 minutes, checking on it often to poke at it and stir it a little. When it was finished, I drained the water, which was a nasty brown-yellow color, and rinsed. After it has been thoroughly rinsed, fill your pot back up with water and another cup of washing soda. Soak your fabric in this for at least 30 minutes. This will give you brighter, more vibrant colors and is especially important when doing a grad dye where you are diluting the dye. Wring it out when it is done but do not rinse. It is now ready to dye, but in my case, I hung it out to dry (it is generally advised not to put fabric soaked in soda ash in an electric dryer, as it could be combustible), and then hemmed it when it was dry. I did this because I knew that I was not going to be able to dye it that day. I didn't end up getting back to this project for almost a week. When I was ready to dye, I was planning to just re-dampen it with water, but decided to just make a smaller batch of washing soda and water solution and wrung it out so that it was wet but not dripping. You could, instead, hem it last. It's entirely up to you what order you want to do it in. The only advice I can give is that if you do it as I did, avoid spritzing it with water to dampen it, as it could make some spots that show up afterward. Now for the fun part! Mix your dye and prepare the dye bath. To do this, I had a separate container and added one packet of dye and 4 cups warm water, as directed on the package. I mixed it until it was dissolved. I had filled my gallon water jug with water and added it to the rubbermaid tote that I was using, and added 1/4 cup salt and 1 cup washing soda. I mixed those together before adding the dye. I then mixed the second packet of fuchsia in the same way, and added it to the dye bath. I folded my fabric in half lengthwise, then did an accordion fold and attached the top of the fabric to the hanger clips. To do an accordion fold, grab the ends that are folded in half and gently fold the fabric back and forth, making pleats in the fabric that are the width of your hanger clips. It should look something like this illustration: 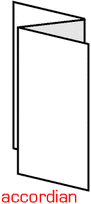 Place your rod high enough so that only the very bottom of your fabric will be resting in the dye at the level it is right now. I did not have anywhere to rest my rod where it would be high enough, so I just draped the hangers over a broomstick resting on top of the rubbermaid bucket itself, and made sure to watch it the entire time so that I could be sure that it didn't drop into the bucket. 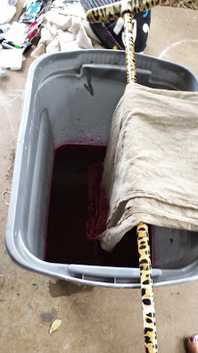 I set the timer for 5 minutes and let it sit. Meanwhile, I filled up my water jug with another gallon of water. When the 5 minutes were up, I SLOWLY added the gallon to the dye bath. Don't let the water splash, or it could make droplets on your fabric. Now I set the timer for 4 minutes, and it was 4 minutes for every level thereafter. Anything more than 3-4 minutes could cause distinct lines instead of the gradual fade that you want. Every time you add a gallon of water, you can add more soda ash and salt. I forgot this step (oops) and it turned out great, so this step is optional. After the fourth time adding water, I decided not to dilute the dye anymore, but instead, lower the fabric into the dye. At this point, the bottom rail of my wrap has been soaking in the dye for 28 minutes and had a stronger concentration of dye for the first 5. Now I was at the middle and lowered the fabric on the rod. If you are using a tension rod in the shower, you could just lower the rod against the wall. Or, if you have a pulley system set up, you would loosen the rope. I did this step twice, and then transferred the fabric to my bathtub. While it is still on the hangers, I like to hang it up in my shower for a few hours to allow it to batch. I don't worry about staining my tub; it all comes out with bleach and a sponge. When that is done, I rinsed in cold water until the water is clear. Be careful not to rinse the untouched side of the fabric, so as not to rinse out the soda ash soak. After doing this, I then folded the fabric again in the same accordion fold, only now the pink end was clipped to the hangers. Time to dye the other side! I repeat the exact steps with the other rail, hang it up to batch, then rinse with cold water until the water is clear (either by hand or in the washing machine). Next, I rinse my wrap on hot. You should be able to do just a couple of hot water wash cycles in your washing machine, just to get rid of any more excess dye, but if you have blue Dawn dish soap or Synthropol, you will want to add a small amount to the first hot rinse to help remove excess dye. If you have not already hemmed it, that will be your final step before you can start wrapping! I was very happy with how mine turned out, and it was surprisingly easy. The hardest and more laborious step is the rinsing if you don't choose to use your washing machine, but if you have a hose and maybe a drying rack, you could try rinsing it out that way! As usual, I welcome any comments, questions or suggestions. If you find this tutorial useful and make your own creation, feel free to post it below as well! -Astrid  Size 3 hip carry Size 3 hip carry I am not your average petite body shape. I am not short, but I am skinny and have a small frame. I am 5'7", 115 lbs. Because of my small size, large wraps are a hassle. I don't have a large chest, my hips are narrow and my daughter is a thin slip of a thing. My size 7 is wonderful for wraps, and I can't wait to try some new carries, like this one: The FRANKENCARRY! But, for everyday use, that is a lot of fabric for me. The Ergo is a nice option for easy on and off, but the hip buckle does not get tight enough on me. A future project will be a mei tai, which I will share on my blog, but for now I enjoy my shorty size 3 wrap that I made, which is shown here in an earlier blog post. So far, my favorite carry with a shorty wrap is a hip carry, which my daughter loves. It's super convenient, can be wrapped while sitting down (tighten when you stand) and is comfortable. The only times I have noticed digging in my shoulder or some type of shoulder or back pain is when I haven't spread the rails and tightened properly. All it takes is a little practice and it will literally be the most convenient baby item you own. First of all, the size of the wrap. A shorty is a wrap that is sized 2 or 3, which is roughly about 3-4 yards. There are so many beautiful woven wraps out there, and if you are looking for a brand new one, you might try some of these sites: http://wovenwraps.com/ http://shop.paxbaby.com/shop/ Etsy HyenaCart Amazon Alternatively, you could check out the many swap boards on Facebook, Babycenter.com or TheBabywearer.com for gently used wraps and carriers. Of course, you could also try your hand at a DIY wrap, which only requires hemming. You can do this yourself with a basic sewing machine, or you can take it to a tailor for hemming (average cost is usually $20-25). Try to remember that women all over the world babywear using blankets, scarves, shawls and even towels, so as long as you are using a non-stretchy, tightly woven cotton fabric, it can work. I will be posting more on DIY wraps later, but for now, if you are new to babywearing, you might feel more comfortable buying a finished wrap. Here are one of my favorite YouTube videos of of a great hip carry with short woven wrap: No No No Hip Carry (No rings no sew no tie) This video is one of the best. At 1:35, you see her tugging on the fabric and pulling it back and forth. This is what you do to find your top and bottom rails. A rail is the long edge of the wrap, top and bottom. When you scrunch up fabric, you don't want the top and bottom edge to be lost inside. If it is, it will not be tight enough and your carry will be loose and unsafe. Another good feature of this video is at 3:02, where she tucks the bottom rail deep down underneath baby's bum. This gives the baby a good "seat", which will be more comfortable. Make sure the seat extends from knee to knee. Baby's legs should be in an "M" shape. Some other shorty wrap carries include back carries, front carries and some that require one or two rings. Rings need to be weight tested and baby safe. A good place to order some are slingrings.com. They sell weight tested rings at home improvement stores, but they are heavier, not baby safe and will get very hot if left in the sun. However, it's up to you which ones you choose to use. Another great, fast and easy hip carry that you can prep quickly: Coolest Hip Cross Carry (CHCC) Back carries you can do with a size 2 or 3 wrap: Knotless Double Rebozo Back Carry Double Rebozo A good tutorial on all kinds of carries with short wraps: Short carry techniques for size 2 or 3 woven wraps There are plenty more, and I encourage you to browse the videos on YouTube for more carries. Practice makes perfect, and you can practice with a baby doll or stuffed animal if your little one is still in the oven., like I did: 
Elmo is such a good baby!
Once baby is here, practice your wrap carries over a bed. When they are newborns, babies are so small and a large wrap like my size 7 is a lot of fabric. You might find a short wrap easier and less bulky. You might also try a stretchy wrap, like a Moby. those are shorter and easy to wrap; just keep in mind, however, that they are intended only for front carries, and for babies under 15 lbs. After that, the baby's weight will stretch the wrap too much to make a tight carry and is not safe.
I hope this "short" (ha!) post has been helpful, and has inspired you to give woven wraps a try! Not only are they great for all ages and sizes, but they can be the most beautiful baby related items you own. They can double as blankets or nursing covers when out, and when your child has outgrown them, you can re-purpose them for soooo many things (that will need to be a separate blog post one day!). Thanks for reading! 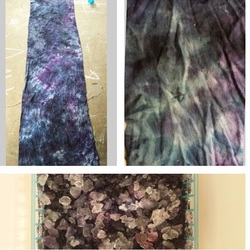 First, I will preface this tutorial by saying that I own THE most beautiful wrap ever made: the Ellvill Zara Tri-Green, which is a cotton/linen woven wrap. I love this wrap, it is gorgeous and is a size 7, which is long enough to do every single type of carry, and is long enough for even my 6'2", 275lb+ husband to babywear either one of our kids. However, this also means that it is monstrously long for me, at 5'7" 115 lbs. I have a slight frame and very petite build, and wrapping in public is no easy feat when you are dealing with almost 6 yards of fabric. I wanted a faster, more convenient way to back carry my daughter, so I borrowed an Ergo from a friend. I love the ease and convenience of the Ergo, but was presented with two problems (aka: First World Problems):
The solution was clear: I needed a shorter wrap. I did some research and found that a lot of DIY babywearers were using a fabric called osnaburg to make their own wraps. I learned that osnaburg has a strong, tight weave after it shrinks, softens and breaks in easily, and is perfect for dyeing. I wanted a size 3 wrap, and I followed this guide for selecting how many yards I would need to buy: size 2 - 2.7 meters = 8.86 feet = 102.36 inches size 3 - 3.1 meters = 10.17 feet = 122.05 inches size 4 - 3.6 meters = 11.81 feet = 141.73 inches size 5 - 4.2 meters = 13.78 feet = 165 inches size 6 - 4.6 meters = 15.09 feet = 181.10 inches size 7 - 5.2 meters = 17.06 feet = 204.72 inches size 8 – 5.60 meters = 18.37 feet = 220.47 inches (http://paxbaby.com/paxbabys-woven-wrap-guide/) Osnaburg will shrink quite a bit when washed. This is a good thing, because it tightens the weave of the threads, but it means that you will need to buy an extra 1-2 yards of fabric. Fortunately, osnaburg is very inexpensive. I got mine for $2.99/yard at Walmart, and it costs about the same at Hobby Lobby or Joann Fabrics if you use their usual 40% coupon. I bought a little over 4 yards and immediately threw it in the wash when I got home. After prewashing and drying it, I scoured it, which is recommended by many dyeing pros. Many people will use a large stainless steel pot, but I only had my washing machine. I filled the machine with hot water and added a cup of washing soda. I left it to soak for about 15 minutes, though some recommend boiling in a pot for an hour. I drained the water and did it again, but then went ahead and dried it. The most fun I have ever had cutting fabric was with this next step. My fabric was 54" wide, way too wide for a wrap. The average width of a woven wrap is anywhere between 28-32". With osnaburg, all you need to do is mark your 30" (or whatever width you desire), make a small cut with a pair of scissors and....RIP! Trust me! Don't be scared. RIP that baby. The secret is in how the fabric is woven; it will tear in a straighter line than you will ever be able to cut, even with a rotary cutter. So don't worry, let it go...just pull on it and rip it all the way off until you have two pieces. It feels very liberating, doesn't it? I had decided to do a galaxy dye, dark with black and blue and bursts of violet and pink. I was hoping that it would look something like this: 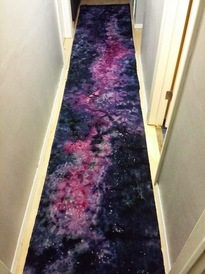 I wanted some stars, so I used some white Elmer's glue to dot some small stars, and then made a star-shaped stencil and a foam brush to make larger stars at random spots throughout the fabric. I let it dry overnight, but it didn't need that long. It was dry long before then, but I was not able to get to it before then. I hemmed it with my serger, serging all the way around the fabric. Then I tapered the edges. A good set of instructions for tapering can be found here. Up next was the exciting part. I bought a $1 plastic basket and a foil roasting pan at Dollar Tree, and scrunched up my fabric until it fit inside of the basket. It was a tight fit, and I worried that the dye wouldn't reach all the way through the folds, but it turned out just fine. Next, I poured ice on top. Crushed ice is nice because you don't have to worry about bigger pieces falling off and taking some of the dye with them, plus the smaller pieces melt faster and it is much more satisfying to watch. After applying the ice, I opened my bags of dye. I used:
I sprinkled the black on first, around the edges, then the rest of the colors in a totally random manner. Then, I waited. 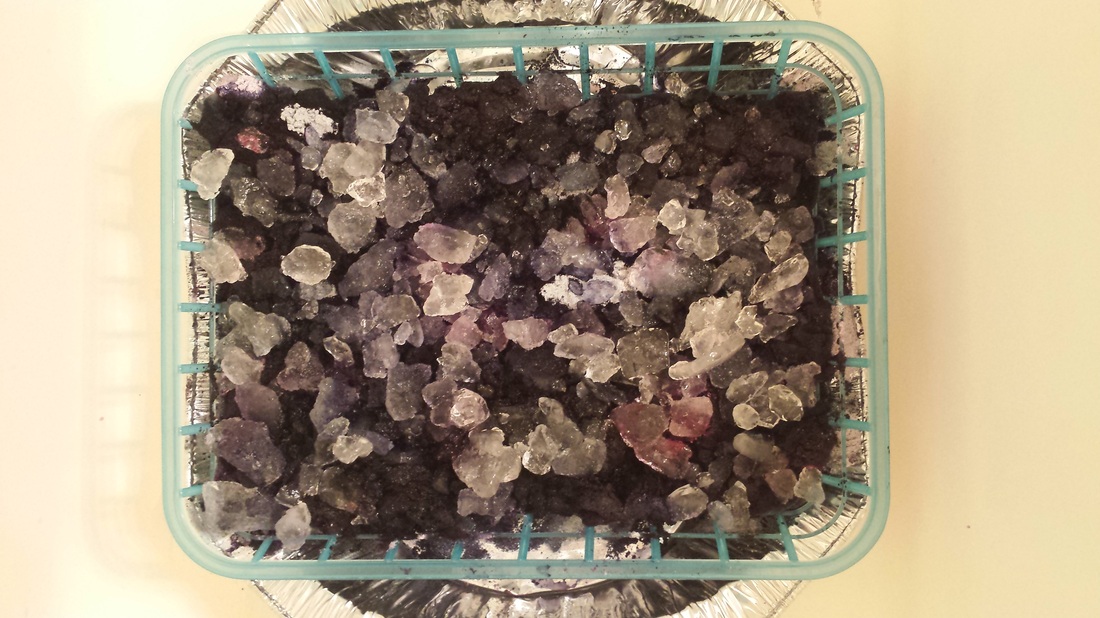 20 lonnnnnnng hours. I added more ice about halfway through, but it was very difficult to wait that long!
Towards the end, I was getting impatient. I took out my hair dryer and let it run on high while the bathroom door was closed. The room got very warm and the ice was melting a lot better. I alternated that with blowing directly on it with a hair dryer. FINALLY..... |
Archives
August 2015
Past ProjectsCategories |

 RSS Feed
