 First, I will preface this tutorial by saying that I own THE most beautiful wrap ever made: the Ellvill Zara Tri-Green, which is a cotton/linen woven wrap. I love this wrap, it is gorgeous and is a size 7, which is long enough to do every single type of carry, and is long enough for even my 6'2", 275lb+ husband to babywear either one of our kids. However, this also means that it is monstrously long for me, at 5'7" 115 lbs. I have a slight frame and very petite build, and wrapping in public is no easy feat when you are dealing with almost 6 yards of fabric. I wanted a faster, more convenient way to back carry my daughter, so I borrowed an Ergo from a friend. I love the ease and convenience of the Ergo, but was presented with two problems (aka: First World Problems):
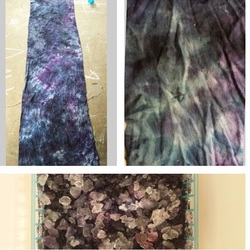
The solution was clear: I needed a shorter wrap. I did some research and found that a lot of DIY babywearers were using a fabric called osnaburg to make their own wraps. I learned that osnaburg has a strong, tight weave after it shrinks, softens and breaks in easily, and is perfect for dyeing. I wanted a size 3 wrap, and I followed this guide for selecting how many yards I would need to buy: size 2 - 2.7 meters = 8.86 feet = 102.36 inches size 3 - 3.1 meters = 10.17 feet = 122.05 inches size 4 - 3.6 meters = 11.81 feet = 141.73 inches size 5 - 4.2 meters = 13.78 feet = 165 inches size 6 - 4.6 meters = 15.09 feet = 181.10 inches size 7 - 5.2 meters = 17.06 feet = 204.72 inches size 8 – 5.60 meters = 18.37 feet = 220.47 inches (http://paxbaby.com/paxbabys-woven-wrap-guide/) Osnaburg will shrink quite a bit when washed. This is a good thing, because it tightens the weave of the threads, but it means that you will need to buy an extra 1-2 yards of fabric. Fortunately, osnaburg is very inexpensive. I got mine for $2.99/yard at Walmart, and it costs about the same at Hobby Lobby or Joann Fabrics if you use their usual 40% coupon. I bought a little over 4 yards and immediately threw it in the wash when I got home. After prewashing and drying it, I scoured it, which is recommended by many dyeing pros. Many people will use a large stainless steel pot, but I only had my washing machine. I filled the machine with hot water and added a cup of washing soda. I left it to soak for about 15 minutes, though some recommend boiling in a pot for an hour. I drained the water and did it again, but then went ahead and dried it. The most fun I have ever had cutting fabric was with this next step. My fabric was 54" wide, way too wide for a wrap. The average width of a woven wrap is anywhere between 28-32". With osnaburg, all you need to do is mark your 30" (or whatever width you desire), make a small cut with a pair of scissors and....RIP! Trust me! Don't be scared. RIP that baby. The secret is in how the fabric is woven; it will tear in a straighter line than you will ever be able to cut, even with a rotary cutter. So don't worry, let it go...just pull on it and rip it all the way off until you have two pieces. It feels very liberating, doesn't it? I had decided to do a galaxy dye, dark with black and blue and bursts of violet and pink. I was hoping that it would look something like this: 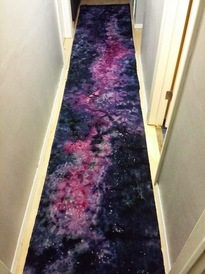 I wanted some stars, so I used some white Elmer's glue to dot some small stars, and then made a star-shaped stencil and a foam brush to make larger stars at random spots throughout the fabric. I let it dry overnight, but it didn't need that long. It was dry long before then, but I was not able to get to it before then. I hemmed it with my serger, serging all the way around the fabric. Then I tapered the edges. A good set of instructions for tapering can be found here. Up next was the exciting part. I bought a $1 plastic basket and a foil roasting pan at Dollar Tree, and scrunched up my fabric until it fit inside of the basket. It was a tight fit, and I worried that the dye wouldn't reach all the way through the folds, but it turned out just fine. Next, I poured ice on top. Crushed ice is nice because you don't have to worry about bigger pieces falling off and taking some of the dye with them, plus the smaller pieces melt faster and it is much more satisfying to watch. After applying the ice, I opened my bags of dye. I used:
I sprinkled the black on first, around the edges, then the rest of the colors in a totally random manner. Then, I waited. 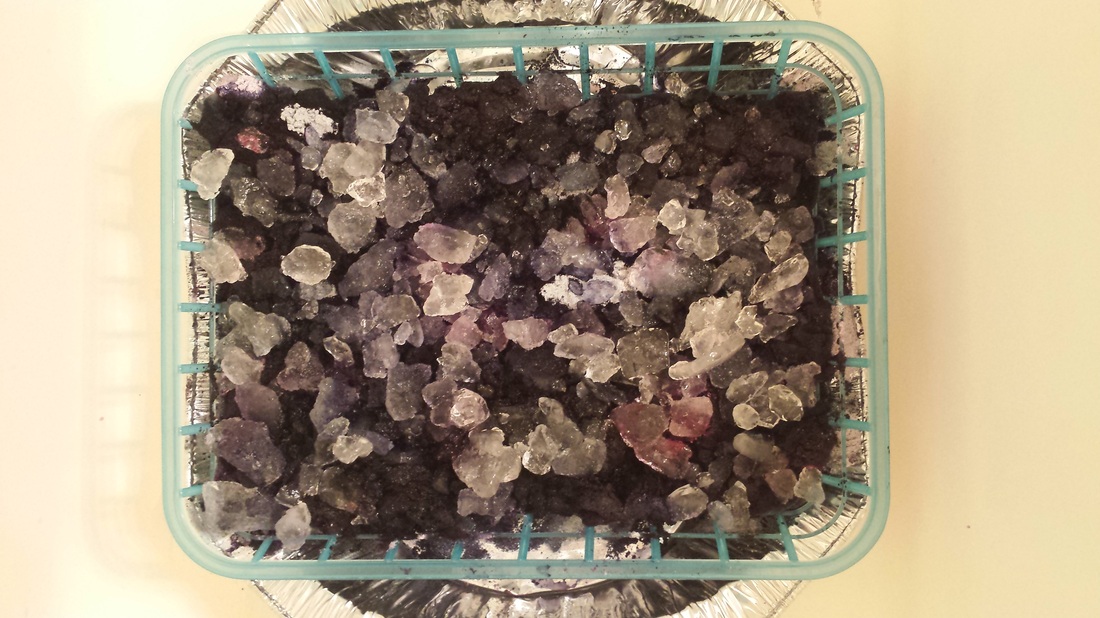 20 lonnnnnnng hours. I added more ice about halfway through, but it was very difficult to wait that long!
Towards the end, I was getting impatient. I took out my hair dryer and let it run on high while the bathroom door was closed. The room got very warm and the ice was melting a lot better. I alternated that with blowing directly on it with a hair dryer. FINALLY.....
4 Comments
|
Archives
August 2015
Past ProjectsCategories |
 RSS Feed
